

Summary
Setup
- Equipment – what’s in the kit : https://youtu.be/tjsNZ_jbm-4?si=_uLpx7WTaDM5hNVG
- What equipment goes where : https://youtu.be/p_d7txLc1-k?si=aZPG9GjNcVtbIG1L
- Attach camera and connect cables : https://youtu.be/dBsPqUCDK6s?si=nbHkKectuh3_cG3H – see below for more details. Note that we attach the camera to a tripod – not a pole
- Setup at laptop end : https://youtu.be/FZpfP34rhVQ?si=VEypIbaV-Uy980xK
- Laptop settings : https://youtu.be/0buiu1PwleA?si=EDnzUFu0JzJD51Fx
Computer settings
- PCS-PRO set-up to enable video capture – see detailed info below
- PCS-PRO auto capture ball clips for highlights packages : https://youtu.be/wnyegxjiP2c
- PCS-PRO creating Match/Day/innings highlights packages : https://youtu.be/tbACF3Bnuvw
- PCS-PRO creating individual player highlights packages : https://youtu.be/tbACF3Bnuvw
- PCS-PRO pre-live streaming preparation : https://youtu.be/tQf5aIpd5D0
- PCS-PRO pre-live streaming best settings : https://youtu.be/KFI5yONY-7A
- PCS-PRO live streaming features and control :https://youtu.be/Z8JykAOJ2CI
- PCS-PRO live streaming controls : https://youtu.be/Qlg29eGCFQ8
- PCS-PRO live streaming activation and auto replays : https://youtu.be/rGU94_bjIy4
- PCS-PRO creating a YouTube event and embedding on Match Centre : https://youtu.be/HbKyF9ZFk8w
- Youtube video streaming library : (105) Video Streaming – YouTube
Detailed info
NV-Play ‘Elite’ hardware video kit – What comes in the kit : https://youtu.be/tjsNZ_jbm-4?si=_uLpx7WTaDM5hNVG
- Four different parcels will be received …
- Telescopic pole
- Tripod on which the ‘Access Point’ is mounted adjacent to the scorer’s laptop
- A generator/power supply unit for the camera and Station.
- A carry case containing the rest of the kit which contains …
- An equipment list.
- Ubiquiti ‘Access Point’ and ‘Station’. The ‘Station’ transmits the video picture from the camera which is received by the ‘Access Point’ which connects to the scorer’s laptop. These are identical devices but are configured differently.
- Two 5 metre LAN cables housed in a cable tidy
- Three bespoke clamps for affixing the telescopic pole to the sightscreen
- A bag of spare parts (not usually needed and doesn’t need to be stored in the carry case but keep just in case).
- Two ‘POE’ injectors with power leads.
- A ‘POE’ injector for powering the camera and transferring the data.
- Three 2 metre Ethernet cables, coloured red, green and blue.
- An ethernet to USB adapter.
- A two-gang socket.
- A backpack, backpack cover and waterproof liner.
- An IP Camera with a mounting bracket attached.
Which equipment goes where? : https://youtu.be/p_d7txLc1-k?si=aZPG9GjNcVtbIG1L
Attaching pole to the sightscreen : https://youtu.be/FWV4oVMSbSA?si=7bDDTuZg8hC5Szjo
- Determine to which slat the pole is to be fixed so that it lines up with the pitch.
- Mount clamps to sightscreen (bottom and middle). Push and slide.
- Position middle clamp at top of bottom section of pole (under black section).
- Ensure both clamps line up by fitting pole in place.
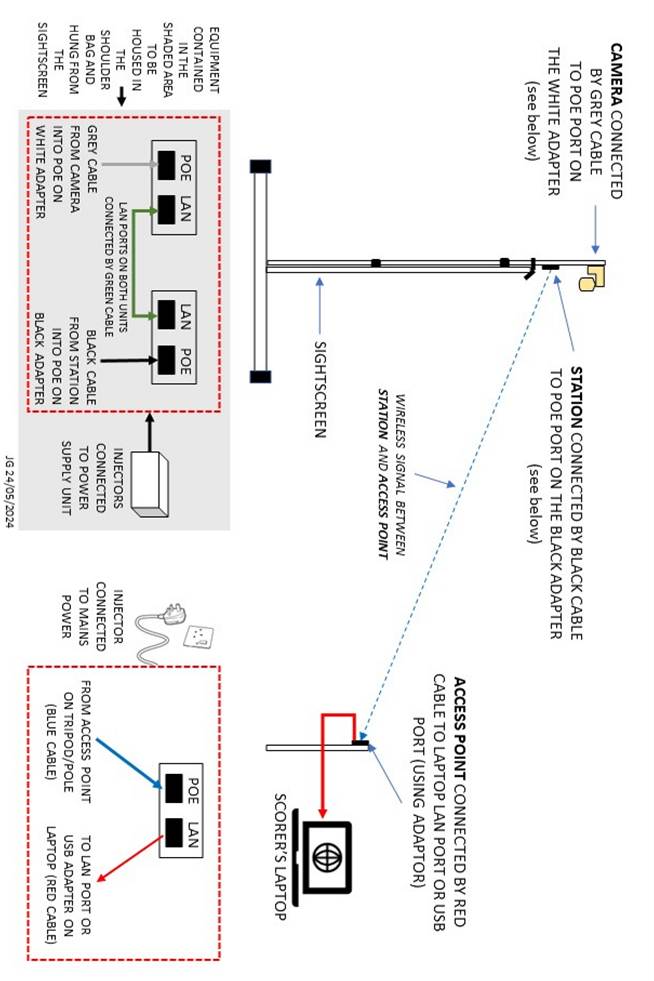
Attach top hook, camera, station to pole and connect cables : https://youtu.be/dBsPqUCDK6s?si=nbHkKectuh3_cG3H
- This assembly can be carried out with the pole on the ground with the top section supported by resting it on the framework of the sightscreen.
- Extend top section of pole and lock.
- Locate top hook assembly on bottom of extended top section ensuring that it is on the same side to the pole locks.
- Fasten the Station (video sender) to the pole using 2 x cable ties. Do not tighten until the station is aligned with the position of the access point (scorer’s position). They should be facing each other with a direct line of sight.
- Plug the black LAN cable into the station by popping off the cover at the bottom of the station and pushing it in until it clicks. Replace the cover to ensure it remains waterproof.
- Tighten the cable tie holding the station on the pole having determined that it will be aligned with the scorer‘s location.
- Attach the camera to the top of the pole: slide the jubilee clip on first followed by the camera bracket (leaving a couple of inches from the top). The jubilee clip is an additional safety device in the unlikely case that the camera bracket fails.
- Tighten the jubilee clip, then slide the station unit up to the camera.
- Plug the grey LAN cable into the cameras ethernet port, protecting it by a black waterproof connector and cover with the waterproofing ‘balloons’.
Attach pole to sightscreen : https://youtu.be/w1rPNTw44wo?si=c7qKQrLzexjhEXqd
- Make sure that the pole lock clips, top mounting bracket and camera are pointing in the same direction and facing away from the sightscreen.
- Place the pole loosely into the clamps to secure. Do not overtighten at this stage as it will prevent the upper sections of the pole from moving and it may be necessary to allow some lateral movement to ensure that the camera etc affixed to the top section is able to clear the back of the sightscreen when it is extended.
- Keep a hand on the middle clamp while the bottom clamp is tightened as the pole is top heavy.
- While holding the pole and ensuring that nothing scrapes against the sightscreen, unlock the highest middle section of the pole and extend it upwards. Do not fully extend the section, always leaving a minimum of 5cms of the section before locking it off. Try to ensure that upper sections of the pole are the least extended if height required allows.
- Do the same for the next section of pole, raising it until the top hook assembly is clear of the top of the screen. Twist the pole so that the top hook assembly can be lowered onto the top of the screen.
- Lock off the section of pole and tighten the middle and bottom pole clamps. Do not overtighten so as not to damage the pole – they just need to be finger tight.
- Ensure that the pole is stable and secure.
Attach power to camera : https://youtu.be/9BimYRS8sRk?si=Lz8gt75nVBibeEWD
- Locate the backpack, the generator, and the PoE (Power over Ethernet) injector.
- Take the generator out of its box. Note that although this purports to be a solar device, it will need re-charging after use by plugging into a mains point. It will last a days play (at least 9 hours).
- Take out the PoE injector and mains power lead. Connect the power lead to the PoE Adaptor, and plug into the two gang socket. Plug the two gang socket into the generator. Turn on the generator and ensure that it displays that it is set for AC current. If showing DC (on the Uking generator), press the AC button for a couple of seconds until AC is displayed.
- Place the generator into the backpack.
- Locate the end of the black ethernet cable and plug it into the POE port on the PoE injector. Locate the end of the grey ethernet cable and plug it into the POE port on the camera injector. Connect these two injectors together via the green ethernet cable, which plugs into the LAN ports on each injector.
- After a 45-60 second delay, the camera power up routine will be initiated, with the camera dome spinning round. Ensure you watch this to check that the camera is powered on.
- Zip up the backpack and hang it on the middle clamp assembly, so it is off the floor if the sightscreens need to be moved.
That completes the installation at the sightscreen.
Set-up at scorer’s end : https://youtu.be/FZpfP34rhVQ?si=VEypIbaV-Uy980xK
- Locate the tripod, the access point, the ethernet to USB adapter, the PoE injector and the x2 2m LAN cables (red+blue).
- Erect the tripod: extend the top section and spread the legs. Push down on the movable centre section to spread the legs to their maximum.
- Affix the access point to the extended tripod using 2 x cable ties. Ensure that the access point is in direct line of sight with the station unit on the sightscreen.
- Remove the cover at the bottom of the access point to reveal the socket into which the blue LAN cable is plugged. Replace the cover to ensure it remains waterproof.
- Locate the PoE injector and connect its power lead. Plug the power lead into a mains socket. Plug the blue LAN cable into the POE port on the PoE injector
- Take the red LAN cable and plug it into the LAN port of the PoE injector and plug the other end into either the ethernet to USB network adapter, or if the scorer’s laptop has an unused RJ45 input socket, preferably directly into the RJ45 socket.
- If the ethernet to USB network adapter has been used, connect the USB cable from the network adaptor into a USB port on the scorer’s laptop. If an unused RJ45 socket has been used, then the network adaptor is not required and can be returned to storage.
- Check that the LED indicator light are lit on the PoE injector which indicates that power is reaching the unit.
Laptop set-up : https://youtu.be/0buiu1PwleA?si=EDnzUFu0JzJD51Fx
- Login to the laptop and load PCS-PRO.
- The following steps (3 to 8) are only needed once. The settings will be retained for all future uses of the video equipment.
- Click on the ‘Settings’ icon on the laptop and select ‘Network & Internet’.
- Click on ‘Change Adaptor Options’ and locate either ‘Ethernet2’ if using the USB network adapter or ‘Ethernet’ if using the spare RJ45 connection. ‘Ethernet2’ will be showing ‘TP-Link Ethernet USB adapter’. Right click on the appropriate network connection and select ‘Properties’.
- From the list, click on ‘Internet Protocol Version 4 (TCP/IPv4)’ and then click ‘Properties’.
- Click on ‘Use the following IP address’ and in the ‘IP Address’ enter ‘10 . 1 . 1 . 10’. The ‘Subnet Mask’ should be set to ‘255 . 255 . 255 . 0’.
- Click on ‘OK’, then ‘Close’.
- Repeat steps 3 to 7 to check that the settings have been saved.
- Close down the ‘Settings’ screen and return to PCS-PRO.
- Note that although the settings will be retained once set, the process described above will need to be repeated if the network connection is changed e.g. from USB network adaptor to RJ45 port.
PCS-PRO set-up to enable video capture.
- Select ‘View’ > ‘Video Analyst – Default’ to obtain a screen with video output.
- Select ‘Tools’ > ‘Configuration’ > ‘Video Capture’.
- Click on ‘Enabled’ under ‘Video Capture’.
- Click on ‘Add Capture Device’ under ‘Video Capture Device’.
- Set ‘Device Type’ to ‘IP Camera’ and click on ‘Search’ in the ‘Connection Details’ region. PCS-PRO will then find the IP camera. The kit owned by Corsham CC will have an address of ’10.1.1.143’. Other clubs will have been notified of their address which will be different.
- Click on this entry and enter the username ‘camkit’ and password ‘king5464’ and login.
- Choose the video resolution required – Main Stream is always recommended when possible/as default (note that higher resolutions will add strain on the laptop and use more data!). Click ‘Add Camera’ and click OK twice. Video will then appear in the video window in PCS-PRO.
- To steer the camera, click on the ‘cog’ in the upper right corner of the video display and click on ‘Show IP camera controls’. Click on ‘Connect’ and use the arrows to pan or tilt, and the magnifying glass to zoom in and out.
PCS-PRO auto capture ball clips for highlights packages : https://youtu.be/wnyegxjiP2c
- This facility captures every ball which allows for replay of any ball and compilation of a highlights package not restricted to wickets and boundaries.
- To enable select ‘Tools’ > ‘Configuration’ > ‘Video Capture’ and in the ‘Auto Capture’ region, tick the ‘Capture Every’ and ‘Ball’ selections.
- Also select ‘Video’ from menu and tick the selections ‘Capture/Edit Video’, ‘Auto Capture Video’, and ‘Live Upload’.
- The clip that is recorded for replay purposes will be 17 seconds for boundaries and 37 seconds for wickets prior to the time when the shot or wicket is scored in PCS-PRO.
PCS-PRO creating Match/Day/innings highlights packages : https://youtu.be/tbACF3Bnuvw
- Highlights packages can be generated in two ways …
- ‘View’ > ‘Video’ > ‘Video Highlights’ which pins a panel to the right-hand edge of the screen.
- Alternatively click on ‘Video’ > ‘Video Packages’ > ‘Generate Highlights Package’ which will open the same dialog box in the centre of the screen.
- Select the ‘Video Source’ required from the options listed and select the highlights required from the right-hand side of the panel. Click on ‘Create’ to start generating the package. Note that this will take some time!
- The resulting window displays the timeline of clips and pre-rolls each of which can be edited further if required.
- When ready, from the options under the down arrow against ‘Create Package’ in the bottom right of the panel select the output to which the package is to be directed and if the package is to be saved for inclusion on a website or display elsewhere, select the required resolution (1080p preferred). Note that the package will take a while to render.
PCS-PRO creating individual player highlights packages : https://youtu.be/tbACF3Bnuvw
- Again, highlights packages for individual players can be generated in two ways …
- ‘Statistics’ > ‘Match Stats Wizard’ and select the ‘Innings’ required.
- This will bring up the ‘Stats Wizard’ panel.
- Click ‘Batter or ‘Bowler’ as required and highlight the name required.
- Click on the ‘Advanced’ tab and select as required.
- Go to the ‘Play Video’ option at bottom right and select ‘Add to New Package’.
- Proceed as per paras 5 and 6 in the previous section to generate the package.
- As an alternative to steps 2-7, it is possible to apply prefiltering by using the innings scorecard. Right-click on the player in question and select ‘Stats Wizard’.
- The panel showing data relevant to the player selected is displayed, and the highlights required can be selected as above. Proceed as per paras 6-7 above.
- To add clips not automatically included already select ‘View’ > ‘Video’ and select ‘View ball by ball’. The resulting stack of clips can be filtered using the selection box at the top of the stack. Select the clip(s) required, right-click and ‘Add to package’.
- Click on ‘View current package’ and if necessary, re-order the clips by dragging.
PCS-PRO pre-live streaming preparation : https://youtu.be/tQf5aIpd5D0
- Check that team colours and logos are correct for the teams playing using menu options ‘Tools’ > ‘Edit Database’ > ‘Teams’.
- Clicking on the ‘cog’ at the top right of the video screen and selecting ‘Overlay Settings’ will allow team colour overrides and any branding watermarks required to be displayed in the top left of the screen to be included. These will become visible in the video window when the ‘Show overlay on the video display’ is selected and the PCS-PRO state ‘Start Play’ has been clicked.
- If branded adverts or videos etc. are to be displayed at times during the live stream, these are to be stored in the \DOCUMENTS\CRICKET MATCHES \_MEDIA folder. This is also the place to store ‘pre-rolls’ for 4s, 6s,wickets etc.
PCS-PRO pre-live streaming best settings : https://youtu.be/KFI5yONY-7A
- Settings for the hardware in use can be auto-detected by PCS-PRO. There are two ways to set PCS-PRO to auto-detect: From the main menu select ‘Video’ > ‘Auto Detect Video Settings …’ or from ‘Configuration’ > ‘Video Capture’ > ‘Auto Detect’ in the ‘Performance Options’ region.
- Clicking on the ‘Auto Detect’ option will run the tool and display current settings together with recommended settings. Click on ‘Apply’ to adopt the recommended settings.
- Next, select the ‘Live Streaming’ tab and set the ‘Streaming Service’ to ‘YouTube’. A key will be required to use this service.
- There are three resolutions available for the streaming service with 720p being the preferred setting which gives a bit rate of 2500. The display will give a rough calculation of the amount of data that will be generated by these settings per hour. Lowering the framerate will reduce the amount of data sent.
PCS-PRO live streaming features and control :https://youtu.be/Z8JykAOJ2CI
- Options in the ‘cog’ menu on the video display screen are as follows …
- ‘Show overlay on Video Display’. This adds the current score banner which includes the individual batsmen’s score, the current bowler and analysis, and the overs remaining. The overlay also includes a logo which appears in the top left corner of the display and can be used to identify a sponsor for example.
- ‘Show live streaming controls’. This shows the current streaming selection settings together with a button to Start (or Stop) live streaming and appears immediately below the video display window.
- ‘Show streaming overlay control’ will bring up hidden display at the right-hand edge of the screen showing all the different overlay options to which images or video clips can be attached. This should initially be set to AUTO or AUTO WITH CARDS (see next section for details of ‘Live Streaming Controls’).
- Clicking on ‘Start Live Stream’ will display a dialog seeking confirmation that permissions to video have been obtained from both umpires and all players. If there has been consent from all parties, PCS-PRO will then ask if you would like to add this stream to the match centre (see section ‘Adding Live Stream to Match Centre’).
- A small window will appear which shows what is being broadcast across the Internet and is useful to check especially if you have chosen to display an advert or replay that differs from the current live capture. A bigger version of this display can be obtained by selecting ‘View’ > ‘Video’ > ‘Live Streaming Output’.
- Together with the live stream display are buttons for ‘Instant Replay’ and ‘Slow-Mo Replay’ functions for non-ball related events.
PCS-PRO live streaming controls : https://youtu.be/Qlg29eGCFQ8
- ‘Show streaming overlay control’ will bring up hidden display at the right-hand edge of the screen showing all the different overlay options to enhance the live stream.
- Before the start of the match select ‘Cards > Match Title’ to fill the display screen with the match details. This is useful to hide pre-match activity of players, groundsman, and umpires etc.
- Just before the start of the match, select AUTO or AUTO WITH CARDS. AUTO will update the score banner with scores as the match is scored, while AUTO WITH CARDS does the same but also includes full screen displays of partnerships, bowling figures, Manhattan etc. as appropriate between overs. The latter is better used later in an innings when runs have been scored or wickets have fallen.
- Most options will appear automatically as the match is scored e.g. maiden over.
PCS-PRO live streaming activation and auto replays : https://youtu.be/rGU94_bjIy4
- ‘Tools’ > ‘Configuration’ > ‘Live Streaming’ and in the ‘Instant Replays region ensure that the ‘Enable Live Stream Instant Replays’ selection is ticked. Replays default to ten seconds in length, but this can be lengthened or shortened as required.
- Also ensure that the ‘Show “Replay” watermark during instant replays’ is ticked. This will remove the score banner and replace it with a ‘Replay’ overlay while the replay is playing.
- Ticking the ‘Show branding pre-roll for instant replays’ allows for the display of a screen to interrupt the live stream for a replay. This defaults to a screen displaying ‘Play-Cricket (see section ‘’ below).
- Click on ‘Auto Replay Settings’ and ensure that ‘Activations’ and ‘Enable Auto Replay’ boxes are ticked for ‘Wickets’, ‘Fours’ and ‘Sixes’.
- ‘Activation Delays’ and ‘Image Display Duration’ can be increased or decreased as required, and there is a box into which the filespec of ‘Custom Pre-Roll Media’ can be added if required.
PCS-PRO creating a YouTube event and embedding on Match Centre : https://youtu.be/HbKyF9ZFk8w
- It is recommended that a You Tube Scheduled Stream is created for each match.
- Login to a YouTube account and select ‘You Tube Studio’.
- Click on ‘Create’ at the top right of the screen and ‘Go Live’.
- Click on ‘Schedule a stream’ and ‘Create New’.
- Add a title for the video e.g. the match.
- Select the appropriate audience option e.g. Public and enter a description.
- Select an appropriate category for the video to assist searching.
- Select the date when the match was played and upload a thumbnail e.g. Club Image.
- Respond to the age restriction validation details then scroll to the bottom of the screen and click on ‘Create stream’.
- There is an opportunity to edit any of the details entered so far.
- Go to the ‘Stream Key’ and ‘Copy’ then return to PCS-PRO ‘Tools’ > ‘Configuration’ > ‘Live Streaming’ and paste the copied key into the ‘Stream Key’ field. Note, this only needs to be done once, unless there is changing of YouTube channels on the laptop.
- Click on ‘OK’ and all is ready to stream the match.
- Once streaming has started, return to You Tube and wait for the view to begin, then right-click on the display and ‘Copy the embed code’. Return to PCS-PRO and select ‘Live’ > ‘Add live to Match Centre’ and paste the copied embed code. Note, The URL taken from Scheduled Stream can also be copied and pasted.
FURTHER TIPS AND INFO…
Internet bandwidth
4-5 Mbps Upload is poor. 4G/5G should obtain a consistent 10 Mbps to 40 Mbps, but occasionally from being under the minimum of 6 Mbps from WiFi in a rural 4G location the following can improve matters:
Turn <Live Upload> OFF, but still set <Capture/Auto-Capture video>. Clips then get saved only to hard drive/SSD. Post-match, when in a better Internet bandwidth environment, use <Upload Video Now>. That offers the stream (in isolation) the full available bandwidth. However, during a longer Interval (lunch etc), temporarily turn <Live Upload> back on. PCS Pro then prioritises the highlight clips upload whilst the stream (over lunch) is only showing the <Match Status> card, so any stream buffering isn’t of any consequence.
Ahead of the Match, evaluate your best Internet Connectivity both in terms of Upload Speed, but also reliability. See the NV Play website for more on internet options – What to do when your Internet is inconsistent – NV Play Support Centre
Mobile phones can be used as a ‘Hot spot’. In the Phone, <Forget> club WiFi (so it won’t interfere), then switch off WiFi so that it goes only into 4G/5G. Then set permit Hot Spot. It will ask, <Turn on WiFi or USB/Bluetooth>? Choose WiFi. The phone will stay in 4G/5G mode, but will now appear in the laptop WiFi list, so connect to it by its local WiFi. Then connect the I-Phone charger to the mains to keep the phone battery topped up.
Missing clip footage due to fielder identification delay
<Autocapture> records 37 seconds for wickets. If the completion of the wicket in PCS-PRO takes longer due to a delay in the identification of the catcher/fielder, then the shot that resulted in the wicket will often be missed. When there is doubt, select catcher/fielder <unknown> before time (37s) runs out. Of course, it will then never get corrected on the stream overlay/package clip as that is a one-time broadcast. However, as soon as convenient, and as soon as the fielder has been identified, use <Edit> in PCS-Pro to change from ‘Unknown’ to ‘Player X’, then the clip text narrative, any future stream overlays and any cards (and of course Play Cricket) will show the correct information.
Live stream replays
Ensure that the ‘Show Streaming Overlay Controls’ hidden menu is enabled when live streaming, then use <Last Ball> for any in-stream replays. Using <Auto-Replay> or <Instant Replay> is prone to missing the shot due to the timings used by PCS-PRO. In Auto-capture, <Last Ball> is best, but do allow 37 seconds to elapse before playing the replay of a wicket.
Addition of a wide-angle camera for capture of fielding
It is possible to mount an additional camera to the existing pole. The additional camera must be IP POE. Feed both IP streams by ethernet cable into a sufficiently powerful network switch offering POE+. That combined stream data goes via a POE+ Ubiquiti Station and then travels wirelessly (from sight screen) to the Access Point at the laptop. In PCS Pro, simply <ADD capture device> for each camera and the <Video Display> Window then has two toggles, (camera1) and (camera2). As soon as the ball leaves the field of view of camera1 I simply click on camera 2.
Audio lag
Audio lag can be a distinct issue whether using sound effects or commentary microphones (or both). After a couple of hours, the Video Display window can (progressively) be perhaps 1 to 3 seconds behind the live action due the build-up of milliseconds lag being lost between cameras and laptop, so any audio going straight into the laptop can get ahead of the images. Sound effects (bat on ball and “howszat”) are troubling. To overcome the lag, every six overs (hand sanitisation breaks) put up a <Card>. Hidden behind that card use <Reconnect all camera devices> (right click on a camera toggle to find this command). What this does is clear the video cache and it eliminates any accumulated lag and then Video and Audio get back into synchronisation. How often you might need to do this depends on the lag experienced and with faster graphics processing it might not be necessary.
Using ‘YouTube’
YouTube is better than it once was. Always establish a new Stream Event (never use the previous). Then, if even your stream breaks (loss of Internet, camera off, battery failure etc) and it suffers a loss of video data it will auto-reconnect under the same stream key/event. But having set up a unique <event> remember to manually <END> event (never auto-end) post-match. Once the Stream Event is established in YouTube, post the Match Title in PCS-Pro and hit <Start Live Stream> so after the thumbnail posted in YouTube viewers first see a Match Title screen. Then when it appears in YouTube Studio Preview, press <Go Live>. Once live there, Capture/Save the Embed Key in YouTube (right click on Preview) and cut and paste it into<Add to Match Centre> back in PCS Pro.
Practice/learn how to use YouTube by downloading the England v Australia Demo Game in PCS Pro. Immediately after downloading, <export> that to the computer desktop. Then using <Import> a ‘clean’ match is available from its start. Using the laptop’s webcam or a local video file, create a private/unlisted Stream Event in YouTube. Of course, the images are of yourself, but with a bit of imagination all of the PCS Pro Video functionality (except Live Upload which is disabled for this demo match) can be practised.
IP ADDRESSES FOR VIDEO EQUIPMENT
IP ADDRESS USERNAME PASSWORD
Adaptor 10.1.1.10
Camera 10.1.1.179 camkit king5464
Station 10.1.1.180 camkit king5464king
Access Point 10.1.1.181 camkit king5464king
Summary NV Play settings
Prematch
- Team colours and logos : Tools-> Edit database -> Teams- select team – select Primary and secondary colours – edit team logo (jpg or png file) – keep in folder on laptop
- Branding on matchday – Settings cog above video display-> overlay settings > change color or watermark
- Laptop video best settings : Video-> auto detect video settings (or Tools->Video capture->performance options-> Auto detect )
On day of match
After toss and first innings of match
- Overlays on video display : settings cog on video display-> tick ‘show overlay video display’ and tick ‘show livestreaming controls’ and tic ‘ show streaming overlay control’
- To view Livestream in larger view : View-> Video-> livestreaming output
- To show match title ahead of game : ‘streaming overlay control’ -> ‘ match title’
- Auto – automatic updating of batter and bowler info – use this initially
- Auto with cards – between overs shows other info
- Manhattan or other cards as and when – then click ‘auto or auto with cards’
- Instant replays : tools-> configuration -> Livestreaming -> enable livstreaming instant replays
- Ball by ball :
- Highlights package : View -> video->videohighlights or video->videopackages->generate highlights packages . Select various options then ‘create’ . Can save or play in livestream
- Create player highlights package : stats-> match stats wizard -> select bowlers – add play video-> add to package